Bubble.io Pricing Explained: Choose Your Perfect Plan
Bubble.io Pricing Explained: Choose Your Perfect Plan
Meta Description: Bubble.io Pricing Explained: Choose Your Perfect Plan – A comprehensive, up-to-date 2025 guide to Bubble.io’s pricing tiers, features, workload units, and how to pick the ideal no-code plan for your app.
Outline
1. Introduction
2. What is Bubble.io?
3. Why Your Pricing Plan Choice Matters
4. Bubble.io's Pricing Structure (Overview)
5. Understanding Workload Units (WUs)
6. Free Plan – Features, Limitations, and Ideal Use Cases
7. Starter Plan – Launching Your First App
8. Growth Plan – Scaling Up Your App
9. Team Plan – For Business and Collaboration
10. How Sidetool Can Accelerate Your Bubble.io Development
11. Enterprise Plan – Custom Solutions for Large-Scale Needs
12. Feature Comparison of Plans
13. Workload Tiers and Add-Ons
14. Scalability and Upgrading
15. Tips for Choosing the Perfect Plan
16. Frequently Asked Questions (FAQs)
17. Conclusion
Introduction
Bubble.io Pricing Explained: Choose Your Perfect Plan – Selecting the right Bubble.io plan can make or break your no-code app’s success. Bubble.io is a popular no-code platform that empowers you to build web applications without coding. But with multiple pricing tiers and a unique usage-based model, it’s important to understand how each plan works. In this comprehensive guide, we’ll break down Bubble.io’s pricing in simple terms and help you choose the perfect plan for your needs. We’ll cover everything from Workload Units (WUs) – Bubble’s metric for usage – to feature limitations, use cases, and tips for scaling your app optimistically. This article will focus on Bubble's pricing structure, including how costs are determined and what you need to know about usage and scalability. By the end, you’ll have a clear picture of which Bubble plan offers the best value for your project in 2025, and how to optimize costs as your app grows. Imagine choosing a plan without fully understanding the pricing model—this guide will help you avoid surprises and make informed decisions. Let’s dive in!
What is Bubble.io?
Bubble.io is a no-code development platform that lets anyone build powerful web applications through a visual interface. Users with little or no coding experience can use Bubble to create apps, as the platform is designed for non-technical users. Instead of writing code, you design your app by dragging and dropping elements and defining workflows. This makes app development accessible to general users and businesses without programming expertise, and offers a minimal learning curve for beginners. Bubble’s platform includes everything needed to create full-stack web apps – from the user interface to the database. Users can build on Bubble using its visual tools, integrations with external services, and even custom code if needed. The component library is extensive, and there are many templates available to help you quickly build and design professional-looking apps. Whether you’re a solo entrepreneur prototyping an idea or a team building a software product, Bubble provides the tools to get started quickly.
Importantly, Bubble.io operates on a subscription model. While you can begin building for free, the free plan is ideal for those looking to learn Bubble and get familiar with its features. Advanced functionality (like deploying a live app with your own domain or handling lots of users) requires upgrading to a paid plan. Each plan comes with certain feature allowances and usage limits, which we’ll explain. Understanding how Bubble’s pricing works is key to making the most of this no-code platform without overspending.
Why Your Pricing Plan Choice Matters
Choosing the right Bubble.io pricing plan is a critical decision. Your plan determines what features you have access to, how your app performs under load, and how much you pay each month. It’s important to be aware of bubble's features and limitations, as some advanced capabilities or integrations may only be available on certain plans. Bubble offers a range of pricing plans to suit different needs and budgets, so selecting the right one is essential for your app’s requirements. Here’s why it matters:
- Access to Key Features: Certain capabilities (for example, using a custom domain, removing Bubble’s branding, or enabling advanced security features) are only available on higher-tier plans. Picking the correct plan ensures you have the features you need for your app’s purpose.
- Cost-Effectiveness: Each plan has a monthly cost. You want to avoid overpaying for capacity you don’t use, but you also don’t want unexpected overage charges from using more resources than your plan includes. The right plan strikes a balance for your budget.
- Scalability and Performance: As your user base grows, your app will consume more resources. Higher plans include more Workload Units (WU) (Bubble’s measure of usage) and often better performance or higher limits. Selecting a plan that aligns with your app’s scale ensures smooth performance without hitting limits.
- Collaboration & Workflow: If you’re working with a team, some plans allow multiple developers (editors) to collaborate on the app simultaneously. If you choose a plan that’s too limited, you might hinder your team’s productivity or the app’s capabilities.
- Peace of Mind: Finally, the right plan gives you confidence. You can develop and launch your app knowing you won’t suddenly be throttled or shut off for exceeding limits, as long as you stay within your chosen plan’s allowances or configured add-ons.
In short, understanding Bubble.io’s pricing tiers and choosing wisely will save you money and headaches down the road. When selecting a plan, also consider your exit strategy to avoid vendor lock-in if your needs change in the future. Now, let’s explore how Bubble’s pricing is structured and what makes it unique.
Bubble.io’s Pricing Structure (Overview)
Bubble.io uses a usage-based pricing model that is designed to be flexible as your app grows. Bubble's pricing is structured around a combination of a base subscription and usage limits measured in “Workload Units,” which can make costs scale with your app's resource needs. Unlike some platforms that charge a flat fee regardless of usage, Bubble’s pricing plans combine a base subscription with usage limits measured in “Workload Units.” This means you only pay for the resources your app actually needs. The pricing plans are tiered to match different stages of an application’s lifecycle, from idea to enterprise-scale. As of 2025, Bubble offers five main plan tiers:
- Free Plan: $0 per month – For learning and prototyping, with basic features and limited usage capacity.
- Starter Plan: The entry-level paid plan (around $32/month on monthly billing) – Intended for launching small apps with modest usage.
- Growth Plan: Mid-tier plan (around $134/month) – Suited for growing apps with more users and complexity.
- Team Plan: High-tier plan (around $399/month) – Built for businesses and teams that need advanced features, collaboration, and higher usage limits.
- Enterprise (Custom) Plan: Custom pricing – Tailored for large organizations or apps with specialized needs (security, support, massive scale).
Each plan includes a set amount of Workload Units (WUs) per month and a bundle of features. If you exceed the included WUs, you can either upgrade to a higher plan or purchase additional WUs (via workload tiers or overages, which we’ll explain later) to cover the extra usage. This pricing structure gives Bubble users flexibility: you can start free, upgrade as you need more power, and fine-tune your resources without immediately jumping to the next plan.
Key differences between plans often include the number of WUs, whether you can deploy your app live with a custom domain, how many collaborators (team members) can edit the app, the level of version control and backup available, file storage limits, and premium features like enhanced security or the ability to create sub-apps. We’ll dive into each plan in detail next.
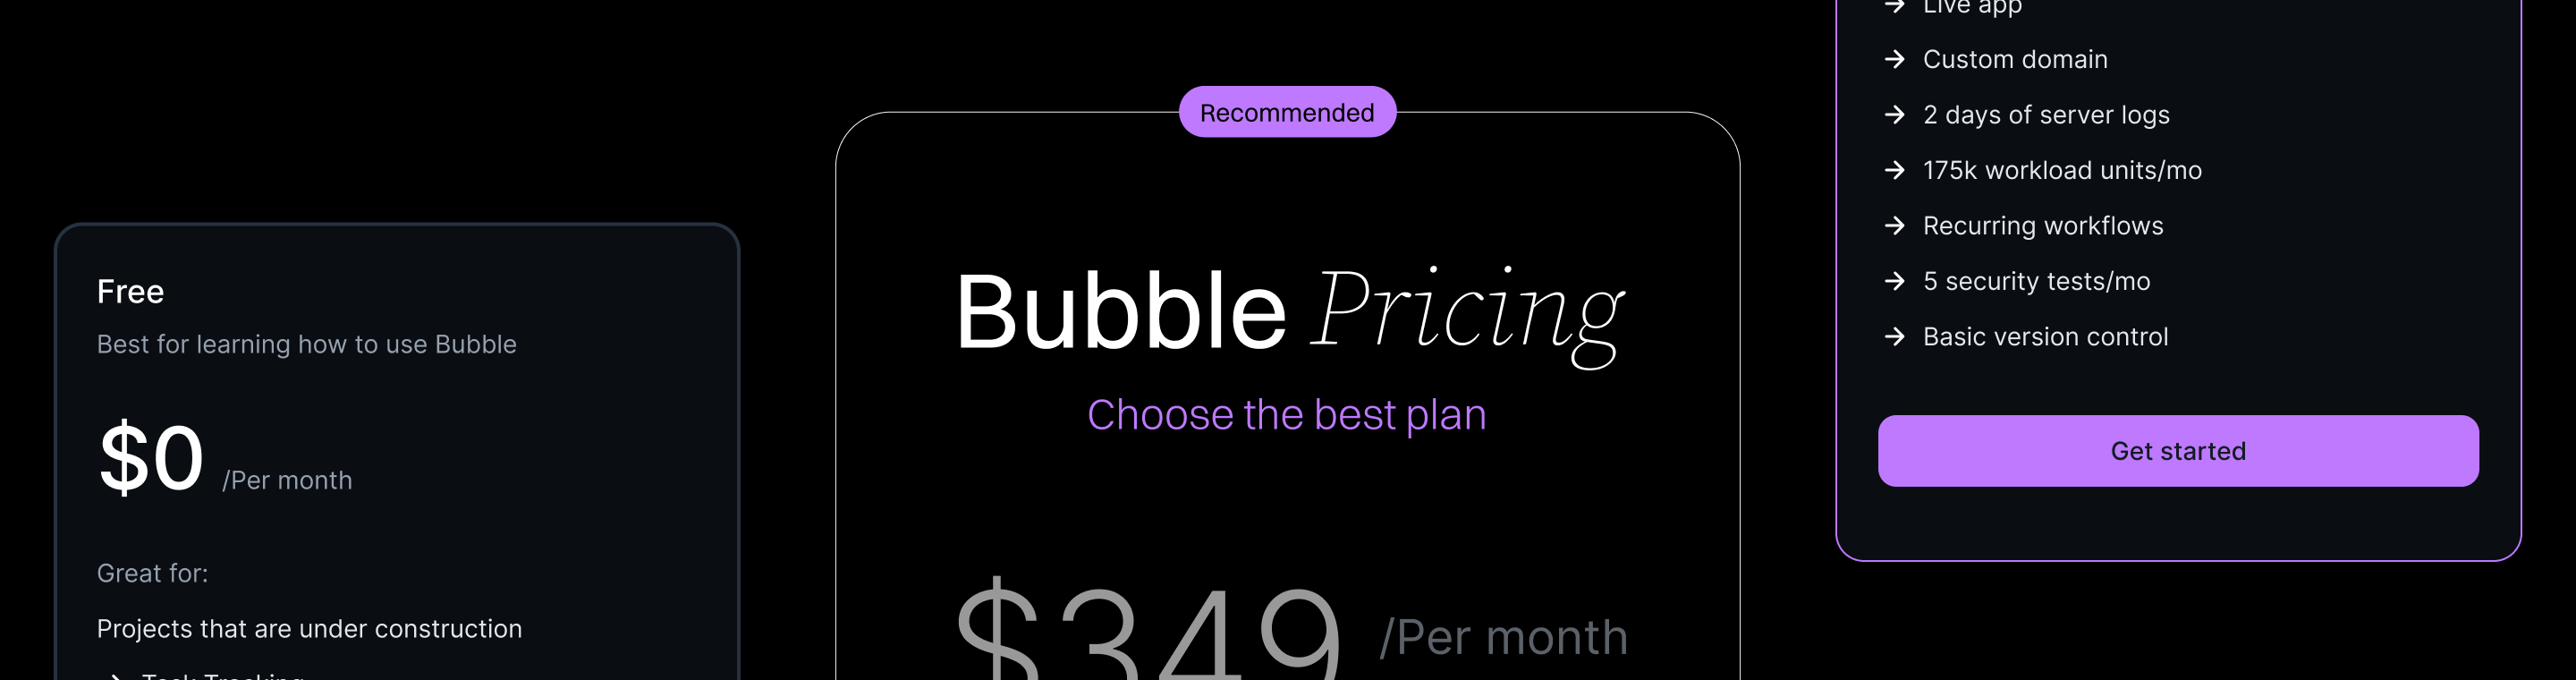
Bubble.io offers multiple pricing tiers – Free, Starter, Growth, Team, and Custom (Enterprise) – each with increasing features and capacity. The image above (from Bubble’s 2023 pricing update) summarizes the core differences: for example, the Starter plan (second column) includes a live app, custom domain, 175k WUs/month, and 7 days of server logs, whereas higher plans like Growth and Team add more WUs, more collaborators, and advanced features. Compared to other platforms, Bubble's pricing plans can be less transparent and may become more expensive as your app scales, while some other platforms like Supabase or Xano offer more straightforward pricing and backend features.

Understanding Workload Units (WUs)
At the heart of Bubble’s pricing model is the concept of Workload Units (WUs). Workload Units measure how much “work” Bubble’s servers are doing to run your application. Every time something happens in your app – a page loads, a user clicks a button that triggers a workflow, data is saved to the database, an API call is made – these actions consume a certain number of WUs. Think of WUs as the fuel your app uses; each feature or action burns a bit of that fuel.
Bubble introduced WUs in 2023 to replace the old “server capacity” limits, providing a clearer and more flexible way to gauge usage. With WUs, your app is no longer hard-throttled by a capacity cap. Instead, you get an allotment of WUs per month included in your plan, and you can add more as needed so your app can keep running at full speed as long as you have enough WUs (just like refilling a fuel tank). This ensures that if your app suddenly has a spike in usage, it won’t slow to a crawl simply because you hit a fixed capacity – you can temporarily use extra workload (with an overage fee or add-on) to maintain performance.
How WUs Work: Each plan includes a certain number of WUs that reset every month. For example, the Starter plan includes 175,000 WUs per month, Growth includes 250,000 WUs, and so on. If you stay under these limits, you just pay your flat plan rate. If you go over, you have options to purchase more units or allow pay-as-you-go overages (more on that later).
To give you a sense of scale, here are some examples of actions and their approximate workload usage:
- Creating or modifying a database record: ~0.5 WU per action.
- Deleting a database record: ~0.1 WU.
- Running a complex search or external API call: might cost multiple WUs, depending on data size and complexity.
- Loading a page with moderate data: could involve a few WUs for retrieving data and initializing workflows.
These are rough estimates, but they illustrate that 175,000 WUs can cover a lot of basic interactions. In fact, most new apps will find the included WUs sufficient for launch. As your app grows, Bubble provides analytics tools (like an App Metrics dashboard) so you can monitor which parts of your app consume the most workload and optimize if needed. The key takeaway is that WUs make Bubble’s pricing usage-based – build freely, and just keep an eye on your app’s resource use.
Now that we understand WUs, let’s explore each Bubble.io plan – what it offers, how much it costs, and when it’s the right choice.

Free Plan – Features, Limitations, and Ideal Use Cases
Bubble’s Free Plan is a generous starting point for anyone new to no-code or testing out an app idea. As the name suggests, it costs $0 per month. This plan is best for learning and prototyping rather than deploying full-fledged apps to real users. Here are the key features and limitations of the Free plan:
- Development Only (No Live Deployment): On the free tier, your app runs in Bubble’s development environment. You cannot deploy your app to live (which means you can’t host it on a custom domain – your app will be on a bubbleapps.io subdomain and intended for testing only). This makes the free plan unsuitable for an app you want to publish for end-users, but it’s perfect for building and experimenting until you’re ready to launch.
- Included Workload & Capacity: The free plan comes with 50,000 WUs per month. This is enough for small-scale testing, personal to-do list apps, simple prototypes, or learning how Bubble works. In terms of performance, Bubble has made the free plan more capable over time – it even includes basic server resources to run your app without the old hard capacity throttling (though naturally, heavy apps will quickly use up 50k WUs).
- Basic Features Only: Despite being free, you get a surprising amount of functionality. You have access to Bubble’s visual editor, the component library (all the core UI elements), and a selection of templates that help you quickly start building and designing your app. You can use the API Connector to integrate external APIs (Bubble now allows API calls on free apps), and you can also take advantage of third party integrations to extend your app’s functionality even on the free plan. However, advanced features are missing – for instance, you cannot schedule recurring workflows (like a daily automated task) on the free plan, and certain plugins or extensions might be off-limits.
- Single Editor & Limited Collaboration: The free plan supports just 1 app editor, which is usually you as the owner. You can’t invite collaborators or additional developers on this tier. This is fine for solo projects, but if you have a team, you’ll need to upgrade to collaborate.
- Bubble Branding: Apps on the free plan display “Built with Bubble” branding. You won’t be able to remove Bubble’s banner or branding elements. This is a minor issue during development, but if you’re presenting to users or investors, branding might appear unprofessional.
- Limited Logs and Backups: Bubble provides a short server log retention window on free apps (only a few hours of logs are accessible, which has been extended to around 5 hours now). Also, while Bubble recently enabled version backups even on Free, it’s minimal – you may have a couple of version restore points, but nothing like the multi-day backups of paid plans. Essentially, troubleshooting and recovering data is harder on Free due to these limits.
Use Cases for the Free Plan:The free tier is ideal for learning how to use Bubble and building non-commercial projects. If you’re just starting out, you can build your app’s foundation for free. Many users build their entire MVP (Minimum Viable Product) on the free plan, then switch to a paid plan only when they’re ready to go live. It’s also great for hobby projects, school projects, or internal tools that don’t need to be public. Keep in mind the free plan is not meant for production: you can’t have a custom domain, and performance will not sustain a large user base. Once you need to share your app with real users or clients, you should upgrade to at least the Starter plan.
Starter Plan – Launching Your First App
The Starter Plan is Bubble’s entry-level paid offering, and it’s the first step when you’re ready to launch a real app. This plan costs $32 per month on a month-to-month basis (or approximately $29/month if billed annually for a yearly cost of $348). The Starter plan is designed for small apps, MVPs, or side projects that have a modest number of users. Here’s what you get with Starter:
- Live App Deployment: Perhaps the biggest jump from Free to Starter is the ability to deploy your application to a live environment. Starter lets you push your app live, which means you can share it with the world. You can also use a custom domain, so your app can be accessed at your own URL (e.g., www.yourapp.com) instead of Bubble’s default domain. This gives your project a professional presence.
- Included Workload: The Starter plan includes 175,000 workload units per month. That’s a substantial increase from the free 50k and is enough for many small-to-moderate usage apps. In practical terms, 175k WUs could cover an app with hundreds of daily active users performing light interactions or a smaller user base doing more complex tasks. For context, Bubble experts have noted that most Bubble apps (around 90%) can run fine on the Starter plan’s capacity for quite a while. It’s a cost-effective way to launch.
- Key Features Gained: Starter includes everything in Free, plus some crucial extras:
- Custom Domain Support: Host your app on your own web domain (e.g., myapp.com).
- Recurring Workflows: You can schedule daily or recurring backend workflows, which the free plan cannot do. This is useful for things like daily emails, nightly data processing, etc.
- API and External Integrations: While the free plan allows basic API calls, the Starter plan solidifies access to Bubble’s API connector with fewer restrictions, enabling your app to communicate with other services reliably and utilize third party integrations to extend your app’s functionality.
- Basic Version Control & Backups: Starter gives you basic versioning – this typically means you have the ability to restore to a backup within a short window (Bubble’s documentation indicates a ~2-day backup restore window for Starter). You also get slightly extended server log access (logs retained for about 7 days on Starter), which helps with debugging.
- Increased File Storage: On Starter, you have more file storage for things like user-uploaded images or files (commonly around 50 GB of file storage included). By comparison, the free plan’s file storage is minimal.
- Two-Factor Authentication (2FA): Security bonus: Starter enables 2FA for your app’s users (as an option), providing an extra layer of login security. (Bubble’s 2023 update mentioned that two-factor auth is unlocked starting on the Growth plan, but some sources indicate basic 2FA is available from Starter—Bubble’s own chart suggests 2FA might actually be on Growth. We clarify in Growth section if needed.)
- Collaboration Limits: The Starter plan is generally for individual developers or very small teams. It supports one app editor (the app owner), same as Free – meaning you don’t get additional collaborators on this plan. If you’re a solo founder or developer, this is fine. If you have a co-developer, you might bump into this limit (Bubble would then require you to move to Growth or add an editor seat if possible). Essentially, Starter is tailored to one-person projects at the launch stage.
When to Choose Starter:Choose the Starter plan when you have a working prototype that you’re ready to share with real users, even if it’s just a beta. It’s perfect for early-stage MVPs (Minimum Viable Products), simple tools, or apps targeting a small user base. For example, if you built a small community forum, a personal finance tracker for a niche group, or a local business app, Starter provides the custom domain and reliability you need to go live without breaking the bank. It’s an excellent choice for launching your first app and covers moderate usage. Many users stick with the Starter plan until they either need more power (workload) or need a feature that’s only in higher tiers. If your app starts gaining traction – say, your user count and activity begin approaching the 175k WU limit regularly, or you find yourself needing more advanced features like additional collaborators – it might be time to look at upgrading to Growth.
Growth Plan – Scaling Up Your App
As your application grows in popularity and complexity, you may outgrow the Starter plan. The Growth Plan (also referred to as the growth tier) is Bubble’s mid-tier offering, built for apps that are gaining serious traction. Priced at $134 per month on the monthly plan (approximately $119/month if paid annually, which comes to about $1,428 per year), the Growth plan offers more of everything: capacity, features, and support for a busier app. Here’s what the Growth plan provides:
- More Workload Units: The Growth plan includes 250,000 WUs per month, giving your app a higher allowance of processing power. This roughly 43% increase in WUs over the Starter plan means you can handle more users or more complex operations without hitting your limit. For instance, you might move to Growth if your app has grown from a few hundred daily users to a few thousand, or if you’re doing a lot of data processing. The extra WUs ensure smooth performance for growing apps.
- Increased Collaboration: One notable upgrade in Growth is the ability to have 2 app editors working on the app. This means you, as the owner, can invite one additional teammate or developer to collaborate in the Bubble editor. For startups or small teams, this is crucial – you can divide development tasks, work concurrently, and use Bubble’s editor together. The Free and Starter plans limit you to a single editor, so Growth is the first plan that truly supports teamwork on the app.
- Removal of Bubble Branding (White Labeling): On the Growth plan, Bubble’s branding on your app is removed. This is often important as your app becomes more professional. Users will no longer see the Bubble banner or be aware that the app was built on Bubble, giving a more polished, white-label appearance.
- Advanced Features & Security: Growth includes everything from Starter plus some advanced goodies:
- Two-Factor Authentication (2FA) for Users: If not already in Starter, Growth definitely allows you to enable 2FA for your app’s user logins. This can be critical for apps dealing with sensitive data or where you want to offer extra account security.
- Enhanced Version Control: With Growth, you get better version control options. Specifically, you have a longer backup & restore window (approximately 14 days). This means if something goes wrong, you can restore your app to any point in the last two weeks. It also likely includes the ability to create multiple development branches (Bubble mentioned “custom branches” for Growth in their announcement). Multiple branches allow you to test new features in parallel without disturbing the main app – a big plus for more complex development.
- Scheduled Workflows: You can run scheduled workflows (not just daily recurring, but on specific schedules or events) which is useful for automating tasks in a growing app (e.g., send weekly summaries, database clean-ups, etc.). This feature becomes more critical as your app logic grows.
- More File Storage: The Growth plan typically raises the file storage limit (e.g., to 100 GB of file storage). So, if your app hosts user-uploaded images, videos, or files, you have double the storage compared to Starter.
- Potential for Sub-apps: (This is an area to clarify: official Bubble info indicates sub-app functionality is a Team plan feature, but some community sources suggest Growth may allow at least creation of one sub-app. Typically, sub-apps – which let you create copies of your app for different clients or environments – are reserved for higher tiers. We will discuss sub-apps fully under Team plan.)
- Use Case Focus: The tagline for Growth is along the lines of “Ideal for growing apps and startups.” It’s perfect for consumer-facing products or business apps that have started to get a steady user base. Examples might include a niche social network, an online marketplace, or a SaaS product in beta that’s onboarding more and more users. If your app has grown beyond the MVP stage and you’re starting to see complex workflows or performance demands, Growth ensures you have the headroom and features needed.
When to Upgrade to Growth:You should consider the Growth plan when your usage or requirements surpass what Starter offers. Concretely, if you find your app nearing the 175k WU limit regularly (or you’re paying frequent overage fees on Starter), it’s time for Growth. Likewise, if you need an extra developer on the project, or if you simply want to remove Bubble’s branding for a more professional look, Growth is the answer. Many startups upgrade to Growth as they enter an expansion phase – you might be adding more features that demand scheduled workflows and more testing (branches), or you have enough users that robust version control and logs (Growth offers about 14 days of server logs for troubleshooting) become important. When your app gains traction and starts attracting more users, upgrading to the growth tier ensures your infrastructure can handle increased demand and scalability needs. Growth plan essentially future-proofs your app for the intermediate stage of scaling.
Team Plan – For Business and Collaboration
The Team Plan (also referred to as the team tier) is Bubble’s premium standard plan (apart from Enterprise), tailored for organizations and advanced projects that require collaboration, scalability, and enterprise-grade features. Priced at $399 per month on the monthly schedule (approximately $349/month if paid annually, about $4,188 per year), the Team plan represents a significant step up in both capacity and capabilities. It’s best for companies or projects where multiple people are building the app and the app serves a large number of users. Here’s what the Team plan offers:
- Large Workload Capacity: The Team plan comes with 500,000 WUs per month included. This half-million WU allowance is double the Growth plan’s capacity, giving your app plenty of breathing room for heavy usage. High-traffic applications, or apps doing intensive operations (like complex data analysis, frequent API calls, or handling thousands of users daily), will benefit from this large WU pool. It ensures high performance even under substantial load.
- Expanded Collaboration – More Editors: As the name implies, the Team plan is designed for teamwork. It supports up to 5 app editors (developers) collaborating on the app simultaneously. This means you can have a proper development team – product manager, multiple developers/designers – all working within Bubble. For a business or a startup with a tech team, this feature is invaluable. You can also manage roles and permissions for each collaborator (who can edit what) to maintain order in development.
- Advanced Version Control & Branching: Team includes all version control features from Growth, plus more. You typically get 20 days of application backups & restore points on Team, the longest for standard plans. More importantly, Team allows a greater number of custom branches for development (Bubble’s docs mention something like up to 20 custom branches on Team). This means your team can have many parallel development threads (for example, working on different features or client customizations concurrently) – a level of control usually needed in professional dev environments. For teams working on complex apps, the ability to leverage third party integrations is crucial, as it allows seamless connection with external services and APIs to extend app functionality.
- Sub-apps Feature: One standout feature of the Team plan is the ability to create sub-apps. Sub-apps let you spawn separate instances of your application that share the same codebase, which is useful if you operate a SaaS product and need separate environments for clients (multi-tenant architecture) or if you want staging/testing versions that are isolated. This was historically only available on the highest plan, and in the new structure Team makes it accessible at a lower price than the old “Production” plan used to be.
- Increased File Storage and Bandwidth: Team plan significantly raises limits on file storage (often around 1 TB of file storage included) and other resource limits like bandwidth (e.g., high monthly data transfer limits). Essentially, it’s built for heavy-duty apps that might host lots of user content (videos, images) or see a lot of traffic.
- Security and Compliance Features: Team plan users benefit from advanced security options. For teams, secure third party integrations are also essential, ensuring that connections to external services and plugins meet compliance requirements:
- Static IP Address: If your app needs to whitelist a specific IP for integrations (say, with an external database or API), Bubble’s Team plan offers a static outgoing IP option.
- SOC 2 Type II Compliance: Bubble’s infrastructure for Team is compliant with SOC 2 Type II, an important security standard for businesses handling sensitive data. This can be crucial if your app is B2B or in a regulated industry.
- Priority Support: While not explicitly listed in all sources, typically higher plans get faster support responses. Enterprise definitely does (with dedicated support), and Team likely has improved support channels compared to lower tiers.
- Use Case Focus: The Team plan is “Best for scaling your team and business.” It’s ideal for established startups, SaaS businesses with a large user base, or any project where multiple developers are building a complex app. For example, an educational platform serving tens of thousands of students, a marketplace with heavy transaction volume, or a company’s internal software used across departments might all fit well on Team. If you have a mission-critical app that requires high reliability and collaboration, Team is designed for that role.
When to Upgrade to Team:Consider the Team plan when your app or organization grows beyond the limits of Growth. Signs it’s time to upgrade include:
- You need more than 2 collaborators regularly working on the app.
- Your app consistently uses close to or over 250k WUs per month (and you’re potentially buying additional WU tiers frequently).
- You require features like sub-apps or advanced security for enterprise clients.
- You want the comfort of longer log retention (Team offers about 20 days of server logs for debugging) and more robust backup options in case of issues.
- Your business clients or data policies demand compliance (like SOC 2) and you want to show that the underlying platform (Bubble) meets those standards. In summary, Team is about scalability and professionalism – it ensures your app can serve a large audience and your development process can scale with a team in a controlled, efficient way. Many businesses will move to Team as their Bubble app becomes a core product or service with significant user activity.
How Sidetool Can Accelerate Your Bubble.io Development
As your Bubble.io application grows and you consider moving to Team or Enterprise plans, you might find yourself needing specialized expertise to maximize your investment. This is where Sidetool comes in as your trusted Bubble.io development partner.
Why Partner with Sidetool for Your Bubble.io Projects?
Expert Bubble.io Development: Sidetool specializes in building sophisticated, scalable applications on Bubble.io. Our team understands the intricacies of workload optimization, ensuring your app runs efficiently within your chosen plan's WU limits. We've helped numerous startups and enterprises build everything from MVPs on Starter plans to complex multi-tenant SaaS platforms on Team and Enterprise tiers.
Cost Optimization Strategies: One of the biggest challenges with Bubble.io is managing costs as you scale. Sidetool's experts can audit your application to identify WU-heavy workflows and optimize them, potentially saving you thousands in monthly fees. We'll help you determine whether you need to upgrade plans or if strategic optimizations can keep you on your current tier longer.
Rapid Development & Launch: While Bubble.io already accelerates development compared to traditional coding, Sidetool takes it further. Our pre-built components, templates, and proven workflows can reduce your time-to-market by 40-60%. Whether you're on Growth plan building your first commercial app or on Team plan scaling to thousands of users, we ensure rapid, quality delivery.
Migration and Integration Services: If you're considering moving from another platform to Bubble.io, or need to integrate Bubble with your existing tech stack, Sidetool provides seamless migration services. We handle complex API integrations, database migrations, and ensure your transition to Bubble.io is smooth—helping you choose the right plan from day one.
Ongoing Support and Maintenance: Unlike freelancers who might disappear after project completion, Sidetool offers continuous support packages. We monitor your WU usage, perform regular optimizations, handle version updates, and ensure your app runs smoothly as Bubble.io evolves. This is especially valuable for Team and Enterprise plan users who need reliability.
When to Consider Sidetool's Services
- Before Upgrading Plans: Consult with us to optimize your current setup—you might not need that expensive upgrade yet
- Complex Feature Development: When building features like multi-tenancy, complex workflows, or advanced integrations
- Performance Issues: If you're burning through WUs faster than expected or facing performance bottlenecks
- Team Augmentation: When you need additional Bubble.io expertise but don't want to hire full-time developers
- Enterprise Requirements: For compliance, security implementations, or custom infrastructure needs
By partnering with Sidetool, you're not just getting developers—you're getting Bubble.io optimization experts who understand both the platform's capabilities and its pricing implications. We'll help ensure you're on the perfect plan for your needs while maximizing the value you get from every workload unit.
Enterprise Plan – Custom Solutions for Large-Scale Needs
For organizations that have unique requirements or very large scale, Bubble.io offers an Enterprise Plan (sometimes referred to as “Custom” plan on the pricing page). The Enterprise plan does not have a fixed price; instead, it’s custom-priced through negotiation with Bubble’s sales team, based on your specific needs. This plan is essentially a bespoke offering for serious, enterprise-level projects, and it includes everything in the Team plan plus many additional benefits tailored to large businesses.
Key aspects of the Enterprise/Custom plan include:
- Custom Workload & Pricing: Enterprise customers can work out a custom arrangement for WUs that fits their usage patterns. You might negotiate a higher base of included WUs (e.g., tens of millions of WUs per month) or special pricing for additional units. The pricing could be a flat annual contract or other structure – it’s flexible but typically much higher cost in exchange for guaranteed resources and service.
- Dedicated Infrastructure and Security: Enterprise often comes with options for dedicated server infrastructure, meaning your app could be on isolated servers for greater reliability and performance. You also get advanced security features:
- Choice of Hosting Location: You may be able to choose where your app’s data is hosted (for compliance with regional data laws – e.g., hosting in EU, US, etc.).
- Enhanced Security Certifications: Beyond SOC 2, enterprise plans might accommodate specific compliance needs like HIPAA or GDPR agreements depending on the case. All enterprise apps typically come with top-tier encryption and security monitoring.
- Single Sign-On (SSO) integration for your team (so your developers or staff can log into Bubble using corporate credentials), which is often a requirement in big companies.
- Unlimited or Higher Limits: Many limits present in Team are lifted or increased:
- Unlimited Version Branches and Backups: Enterprises often get virtually unlimited version history or a much longer backup retention, plus the ability to create many development branches (50+ branches as needed, for example).
- More Collaborators: You can have more than 5 editors – as many as negotiated, allowing large dev teams.
- Multiple Apps under one Plan: In some cases, an enterprise deal might allow you to run multiple applications under a single contract (especially if you need a suite of Bubble apps for your organization).
- Premium Support & Onboarding: Perhaps one of the biggest draws of Enterprise is the level of support. You get priority support, often with an SLA (Service Level Agreement) for response times. Some enterprise customers get a dedicated account manager or even engineering support from Bubble for troubleshooting. There might also be onboarding assistance, training for your team, and other white-glove services.
- Tailored Features: If you need something special, Bubble’s team might work with you. This could include higher API call limits, custom plugin development, or other tweaks not available to standard users. Essentially, the platform bends a bit more to accommodate a paying enterprise client.
- Enterprise Use Cases: This plan is meant for large companies, high-stakes applications, or platforms with enormous scale. Think of a nationwide business launching a consumer app to millions of users, a healthcare company needing HIPAA compliance, or a government platform requiring strict security. Enterprises might also choose this if they simply require the assurance of dedicated resources and support. While the cost is significant (likely thousands of dollars per month or more, depending on usage), it can be justified for mission-critical apps where downtime is not an option.
When to Consider Enterprise:
If your application has grown to the point that even the Team plan feels restrictive – whether in capacity, feature limits, or support – it might be time to talk to Bubble about Enterprise. Also, if your clients or stakeholders require guarantees around uptime, data jurisdiction, or compliance that only a custom agreement can satisfy, Enterprise is the route. From a practical standpoint, most users won’t need this level; it’s truly for those pushing the boundaries of no-code into large-scale production or those who simply have the budget to ensure maximum reliability and service.
On the Bubble pricing page, this tier is usually listed as “Contact us” because you’ll work directly with Bubble to get a quote. It’s the ultimate “Choose Your Perfect Plan” option when your needs go beyond the out-of-the-box offerings.
Feature Comparison of Plans
To better illustrate the differences between Bubble.io plans, let’s compare some key features and limits side by side. The table below highlights the main aspects of each plan: Here's your comparative table converted into text format:
Bubble.io offers five distinct pricing plans designed to accommodate different needs and stages of app development:
Free Plan
Bubble's Free Plan is ideal for solo creators exploring the platform. It offers up to 50,000 Workload Units (WUs) per month at no cost, with a single collaborator (yourself). Server logs are retained for around 5 hours, and you can deploy in development mode only. Custom domains aren't supported, and Bubble branding is always shown.
Starter Plan
At $32 per month (or about $29/month with annual billing), the Starter Plan increases your monthly allowance to 175,000 WUs. It's still designed for individual use, retaining one collaborator. Logs are retained for approximately 7 days, custom domains can be used for live deployments, but the Bubble footer remains visible.
Growth Plan
Priced at $134 per month (or about $119/month annually), the Growth Plan is suited for small teams, offering 250,000 WUs each month. It supports you plus one additional collaborator (total of 2 editors). Server logs are retained for roughly 14 days, custom domains are supported, and Bubble branding can be fully removed, allowing for a white-labeled user experience.
Team Plan
For larger projects or teams, the Team Plan costs $399 per month (approximately $349/month when billed annually). This tier provides 500,000 WUs per month and accommodates up to 5 team editors. Server logs retention extends up to 20 days, and it supports custom domains alongside complete white-labeling.
Enterprise Plan
The Enterprise Plan offers a fully customized solution, tailored to larger businesses with complex needs. Pricing and workload units (in the millions) are negotiable, along with the number of collaborators and extended server log retention. This plan supports custom domains and is fully white-labeled. Contact Bubble's sales team directly for a customized quote.
Notes on the Comparison:
- All paid plans (Starter and up) allow a custom domain and full live deployment. The Free plan is limited to Bubble’s subdomain and intended for development only.
- Bubble branding: On Free and Starter, your app will show Bubble branding elements (like the Bubble footer or banner). Growth and above remove these, giving a white-label experience.
- Collaborators: Free and Starter are essentially single-developer. Growth allows a second collaborator, and Team allows up to five. Enterprise can extend this further as needed.
- Logs Retention is the period you can look back at server logs for debugging. Higher plans have longer retention (useful for diagnosing issues that happened days or weeks ago). For backups/versioning, similarly, Starter has a short restore window (~2 days of backups), Growth ~14 days, Team ~20 days, and Enterprise beyond that.
- File storage and bandwidth (not in the table) also increase with each tier. For instance, Free apps get very little file storage (enough for testing), Starter ~50 GB, Growth ~100 GB, Team ~1 TB, and Enterprise can arrange more. Bandwidth limits (data transfer per month) scale up as well (Free ~1 GB, Starter 100 GB, Growth 500 GB, Team 1 TB as per Bubble’s documentation).
This comparison shows how each step up gives you more resources and features. Next, we’ll look at how you can extend those resources without fully upgrading plans, thanks to Bubble’s workload add-ons.
Workload Tiers and Add-Ons
One of the great things about Bubble’s pricing model is flexibility. If your app occasionally needs more juice (more WUs) than your plan provides, you don’t always have to upgrade to the next plan immediately. Bubble offers Workload Tiers – add-on packages of additional WUs you can buy – as well as overage options that charge you per use beyond your plan. These ensure you can scale smoothly without major hiccups.
Workload Tiers (WU Add-Ons): These are pre-paid bundles of extra workload units you can subscribe to on top of your base plan. Think of it as buying an extra bucket of WUs for the month. The higher the tier, the more WUs and the better the rate per unit (volume discounts apply). You might choose to add a workload tier if you foresee a continuous need for more WUs than your plan includes, but you aren’t ready to jump to the next plan’s features.
Bubble’s workload tiers as of 2025 are roughly:
- Tier 1: +200,000 WUs for about $29 per month (or ~$26/month if annual). Overages beyond this tier are around $0.018 per additional 1K WUs.
- Tier 2: +750,000 WUs for about $99 per month ( $89 monthly on annual). Lower overage rate ($0.014 per 1K WUs) for anything beyond.
- Tier 3: +2.5 million WUs for $299/month (~$269 on annual), with ~$0.012/1K WU overage.
- Tier 4: +6 million WUs for $599/month, overage ~$0.010/1K WUs.
- Tier 5: +20 million WUs for $1,499/month, overage ~$0.008/1K WUs.
- (There might be higher tiers for enterprise, but these five cover most needs.)
These tiers let you incrementally increase your workload capacity. For example, if you’re on Starter (175k WUs) but one month you expect ~350k WUs usage, you could add Tier 1 (200k) to effectively have 375k WUs available, rather than jumping all the way to Growth. This can be cost-saving. In fact, Bubble encourages using tiers to avoid unnecessary plan upgrades if you don’t need the higher plan’s other features. You can stack tiers or change them as needed month by month.
Bubble.io offers “Workload Tier” add-ons that allow you to buy extra workload units on top of your base plan. The image above shows the monthly pricing for various tiers (Tier 1: 200k WUs at $29, Tier 2: 750k WUs at $99, Tier 3: 2.5M WUs at $299, Tier 4: 6M WUs at $599, Tier 5: 20M WUs at $1,499). These tiers come with volume discounts (note the overage rate per additional 1K WUs decreases as the tier size increases). This system lets you scale your app’s capacity without immediately jumping to a higher plan, providing a cost-effective bridge as your workload grows.
Overages (Pay-as-You-Go Usage): If you don’t purchase a tier and you exceed your plan’s WUs in a given month, Bubble can automatically charge overages. Overages are basically a pay-per-use model – you pay for each block of 1,000 WUs over your limit at a certain rate. The rate depends on your plan or tier, as seen above (ranging roughly from $0.018 down to $0.008 per 1k). Bubble’s approach to overages is quite flexible and safe:
- Your app will not suddenly stop or throttle if you go over your WU limit and overages are enabled. It will continue running, and you’ll just be billed for the extra usage. This is great for handling unexpected traffic spikes – your users won’t notice anything, and you handle the cost later.
- You can choose to enable or disable overages in your app settings. If you disable overages, once you hit your limit, your app might enforce limits (to avoid runaway costs). If you enable them, you’re allowing Bubble to charge for overuse (you’ll get warnings at 75% and 100% of your WU limit).
- Overages are good for sporadic spikes. For example, if normally you use ~170k WUs (on Starter) but one month you hit 200k, paying a small overage on that extra 25k might be cheaper than subscribing to a tier year-round.
Managing WU Usage: Bubble provides tools like Workload analytics charts and notifications to help you manage this. You’ll get an email alert when you reach 75% of your allotment, so you have time to consider adding a tier or curbing usage. Another alert comes at 100%, indicating you’ve entered overages (if enabled). This transparency helps maintain cost control and predictability, aligning with Bubble’s goal to make pricing clear and avoid nasty surprises.
In summary, Workload Tiers and overages give you granular control. You can dial your capacity up or down in cost-efficient ways. The combination of plan + optional tiers + occasional overage means you truly “pay for what you need” on Bubble, which is great for optimizing budgets.
Next, let’s discuss overall scalability and how to approach upgrading your plan versus using these add-ons.
Scalability and Upgrading
One of Bubble.io’s strengths is that it allows your app to scale gradually. You can start small and increase capacity as your user base grows. Here’s how to think about scalability with Bubble’s pricing:
- Start Free, then Go Paid: It’s common (and recommended) to begin building on the free plan, since it costs nothing. You can develop your application and even get a few test users. Once you have a viable product ready for broader use, moving to Starter is straightforward. The free plan ensures that cost isn’t a barrier during your initial building and learning phase.
- Monitor Usage: Bubble’s editor includes a “App Metrics” or “Capacity Usage” dashboard where you can monitor your WU consumption in real-time and historically. Use this to understand your app’s patterns. If you notice you’re consistently hitting high usage, plan an upgrade before performance suffers. Bubble’s philosophy is to give transparency so you can proactively adjust your plan.
- When to Upgrade Plans: Upgrade when you need the features of the next plan or when it’s economically sensible. For example, if you’re on Starter and find yourself needing a second editor or approaching 175k WUs regularly, it’s probably time for Growth. If you’re on Growth and need more collaborators or specialized features like sub-apps, consider Team. Remember that an upgrade not only raises your WU limit but also often unlocks new capabilities (as detailed in plan sections above).
- When to Use Add-Ons vs. Upgrading: If your only pain point is WUs (i.e., you’re happy with the features of your current plan), a workload tier add-on can be a cheaper solution than upgrading. For instance, suppose you’re on Starter ($32/mo) and you had a spike that would require ~300k WUs. Instead of jumping to Growth ($134/mo), you could buy a Tier 1 (200k extra WUs for $29) that month. Your cost might be ~$61 and you avoid a big jump. However, if your app consistently needs 300k WUs every month, you might eventually upgrade to Growth for the additional features and higher base WUs. Use tiers for temporary or incremental boosts; upgrade plans for permanent, feature-driven needs.
- Scalability Limits: It’s worth noting that Bubble’s new model (with WUs) is designed to scale much further than the old model. There isn’t a strict “ceiling” where your app can’t grow; it’s more about cost scaling linearly with usage. That said, extremely large apps (millions of users) should have the budget for either high-tier plans or enterprise arrangements. Many companies evaluate Bubble’s cost at scale vs. the cost of traditional development – often it’s still a good deal given the speed of development, but one should be mindful that as usage grows, the Bubble costs will also grow.
- Performance Considerations: Upgrading to a higher plan can also improve performance indirectly because you’re less likely to hit any throttling. On the new WU system, Bubble claims that if you have enough WUs, your app can run at full speed – no more artificial slowdowns. So scaling up in plan or WUs ensures your users get a smooth experience even as demand increases.
- Downgrading or Switching: Bubble allows you to upgrade, downgrade, or cancel at any time. If you over-provisioned, you can drop back down (for example, if your app was seasonal and you had a temporary Growth plan, you could return to Starter in the off-season). Just be careful: downgrading means you might lose access to some features (e.g., if you go from Growth back to Starter, you’ll lose the second collaborator and have to ensure no 2FA requirement that Starter can’t handle, etc.). Always review what features you used that might be premium to the higher plan before downgrading.
- Legacy Plans Note: By 2025, most users have moved to this WU-based system. Bubble had a legacy plan system before 2023. If you’re a long-time user coming back, note that those older “Personal/Professional/Production” plans were phased out by October 2024 in favor of the current structure. So scalability now is all about WUs rather than the old “capacity units” – a change that improved performance and clarity.
In essence, Bubble gives you tools and options to grow at your own pace. Leverage the analytics, plan tiers, and add-ons to tune your app’s resources. And when in doubt, Bubble’s Subscription Planner tool (available on their site) can help estimate what plan is most cost-effective given your usage. Scalability is a journey – Bubble’s pricing model is built to accompany you from a single user to a large enterprise user base.
Tips for Choosing the Perfect Plan
With multiple plans and so much information, how do you decide which Bubble.io plan is “your perfect plan”? Here are some practical tips and considerations to guide your decision:
- Assess Your Stage: Identify whether you’re in the build stage, launch stage, or growth stage of your app.
- If you’re still building or just testing an idea (no real users yet), stick with the Free plan for now. It’s risk-free and you can upgrade when you’re closer to launch.
- If you’re ready to launch to real users but expect it to be small-scale initially, the Starter plan is likely your best bet (professional deployment at minimal cost).
- If you already have an audience or you’re migrating an existing user base into Bubble, consider starting at Growth so you don’t run into limits out of the gate.
- List the Features You Need: Make a list of what you absolutely require for your app:
- Do you need a custom domain and no Bubble branding? (Then you need at least Growth, since Starter still has Bubble branding visible, whereas Growth removes it.)
- Do you need more than one collaborator (like a co-founder developer or a freelancer helping you)? (If yes, Starter won’t suffice; go for Growth or higher.)
- Are features like sub-apps, advanced version control, or increased security important for you? (Those points you toward Team.)
- Is your industry requiring specific compliance or a certain SLA? (Enterprise might be necessary.)
- Estimate Your Usage: Try to project how many users and how much activity you expect in a month. Bubble’s workload metric can be tricky to estimate initially, but consider this: if you have, say, 100 users each doing 50 actions a day that cost ~1 WU each, that’s 100 50 30 ≈ 150,000 WUs/month – Starter could cover that. If you expect thousands of users or very heavy data operations, lean toward Growth or Team. If unsure, Bubble’s subscription planner (and community forums where people share usage patterns) can help.
- Budget for Annual vs Monthly: If you are fairly confident in a plan choice and want to save money, Bubble offers about a 15% discount for annual billing (as we saw: Starter at $29 vs $32, Growth $119 vs $134, Team $349 vs $399). Annual makes sense if you know you’ll stick with Bubble for at least a year and want the lower effective rate. However, if you need flexibility or your needs might change in a couple of months, monthly billing might be better despite the higher cost, because you can upgrade or downgrade without having pre-paid a year.
- Consider Your Exit Strategy: When choosing a plan, think about your exit strategy in case you need to migrate away from Bubble in the future. This is especially important for long-term or scalable projects to avoid vendor lock-in risks.
- Consider Support Needs: On lower plans, support is primarily through Bubble’s forums and standard email (which is generally good, given Bubble’s community is active). Higher plans might give you faster official support. If you anticipate needing a lot of help or quick resolutions, that might be a factor to weigh (though for most small apps, the community and documentation suffice).
- Try a Trial: Bubble often lets you trial a paid plan for free for a limited time (like a few days on Starter or Growth). You can use this to test deploying your app, see if everything works as expected, and gauge performance under that plan’s limits. Utilize trials to make an informed decision, especially if you’re torn between two plans.
- Think Long Term, But Not Too Long: It’s good to choose a plan that fits your needs today with a bit of cushion for the near future. But you don’t need to over-provision for a hypothetical scale five years from now – you can upgrade when you get there. For example, you might dream of having a million users (requiring Team or Enterprise), but if you currently have zero users, you could reasonably start on Starter or Growth and move up as you approach the limits of each tier. Bubble’s scaling options mean there’s little downside to starting lower and upgrading later, aside from a bit of maintenance to switch plans.
- Leverage Community Insights: Check out Bubble’s forum or case studies for stories of apps similar to yours. Often, people share which plan they used and when they upgraded. If someone built, say, an e-commerce app and found that 10k users ran fine on Growth, that’s a good data point if your app is in that realm. Community experiences can provide reassurance and practical benchmarks. Also, compare Bubble with other platforms like Supabase, Xano, or n8n to ensure you’re choosing the best fit for your needs, as these other platforms may offer different backend features, pricing, or performance.
Ultimately, the perfect plan is one that meets your app’s technical needs and fits your budget comfortably, with some room to grow. It’s normal to adjust as you learn more about your app’s usage. Bubble’s pricing is not one-size-fits-all, which is a strength – you can tailor it to your situation.
Now, let’s address some frequently asked questions about Bubble.io pricing and plans, to clarify any remaining doubts.
Frequently Asked Questions (FAQs)
Q1: How much does Bubble.io cost, and what are the main plans available?A:Bubble.io has a free plan and several paid plans. The main tiers are Free, Starter ($32/month), Growth ($134/month), Team ($399/month), and Enterprise (custom pricing). The free plan costs $0 and is great for trying out the platform with 50k WUs included. Starter is $32 on monthly billing (about $29 if paid annually) and is ideal for launching an app with 175k WUs. Growth is $134/month (or ~$119 on annual) with 250k WUs for scaling apps, and Team is $399/month (or ~$349 annual) with 500k WUs for larger projects and teams. Enterprise pricing varies; you negotiate with Bubble for a package tailored to large-scale needs. Each step up unlocks more features (like custom domains on Starter, multiple collaborators on Growth, sub-apps on Team) and more included workload capacity.
Q2: What are Workload Units (WUs), and how do they affect my billing?A: Workload Units (WUs) measure the work done by Bubble’s servers for your app – essentially, your app’s usage. Every plan includes a certain number of WUs per month (e.g., 175k WUs on Starter, 250k on Growth, etc.). If you exceed those in a month, you might incur overage charges or need to buy additional WUs. WUs affect billing in that staying within your included WUs means you just pay your base plan fee, but using more means additional cost. For instance, if you’re on Growth and go beyond 250k WUs, Bubble will charge a small fee per extra 1,000 WUs (unless you’ve pre-purchased a workload tier). It’s pay-as-you-go beyond the included amount. The good news is you can monitor WU usage in Bubble’s dashboard, and you can add WU bundles (tiers) to cover expected overages at a discounted rate. This way, you only pay for what you need.
Q3: Can I start on the Free plan and upgrade later? How easy is it to switch plans or cancel?A: Yes, you can absolutely start on the Free plan and upgrade as your needs grow – this is a common path. Bubble makes it easy to upgrade, downgrade, or cancel at any time through your app’s settings. When you upgrade, the new features and limits become available immediately (and your billing will be prorated if you’re mid-cycle). If you downgrade, you’ll lose access to the higher-tier features as soon as the current billing period ends (or immediately if you choose). Canceling a paid plan will revert your app to the free status at the end of your paid period. There’s no long-term contract for the standard plans; if you’re on monthly billing, it’s month-to-month. Annual plans you pay upfront for a discount, but even then, you could contact Bubble support if you needed to change – though typically you commit for the year to get the savings. In short, switching plans is straightforward, and Bubble even provides a subscription planner tool to help decide the most cost-effective option.
Q4: What are the limitations of the Free plan?A: The Free plan, while feature-rich for building, has several limitations:
- You cannot deploy a live application on a custom domain (your app stays in development mode on a Bubble subdomain).
- Bubble branding is present, and you can’t remove it.
- You get 50,000 WUs which is fine for testing but not meant for sustained real usage.
- Some advanced features are disabled: for example, you can’t run scheduled or recurring workflows on the free plan, and you have very limited capacity for things like API calls in practice.
- Only 1 editor is allowed (no collaboration).
- Limited logging and backup: only a few hours of logs and minimal restore points.
- No guaranteed performance SLA – while your app will run, it might handle heavy load less gracefully since it’s constrained by the low WU and Bubble’s courtesy limits.
Essentially, the free plan is for development and learning. It’s not suitable for an app that you want to distribute to users or use commercially, because of the no-live-app restriction above all. Once you’re done experimenting or building your MVP, you’d upgrade to Starter to actually launch the app to users.
Q5: What happens if my app exceeds the included WUs in my plan? Will my app shut down or will I be charged extra?A: If your app exceeds the included workload units of your plan, it will not immediately shut down. Bubble has mechanisms to handle this:
- If you have overage billing enabled, the app will continue running and Bubble will simply charge you for the extra WUs beyond your plan’s limit at the end of the billing period. You’ll pay per block of 1,000 WUs over, according to your plan’s overage rate. Bubble sends notifications when you hit 75% and 100% of your WU quota so you’re aware of the situation.
- If you disable overages (which you can do in settings), Bubble will enforce the limit to avoid extra charges. This might result in your app being throttled or certain workflows being paused once you hit the cap. However, most users keep overages on to ensure continuity.
In either case, Bubble highly recommends monitoring your usage. If you find you’re consistently going over, you might choose to buy a workload tier add-on for cheaper extra units or upgrade to the next plan. The design is such that your app can handle spikes (with overages) and you can then make a decision on how to adjust resources. It’s a flexible system to avoid any hard cut-offs in service.
Q6: Is Bubble.io’s pricing considered good value for what it offers?A: Value can be subjective, but generally Bubble offers a lot of value given it replaces the need for a development team to build and host a web app. Consider that on Bubble you’re not only getting hosting, but also the development platform, database, and more. For many entrepreneurs, paying $29–$134 a month to run an app is far cheaper than hiring developers or dealing with cloud infrastructure costs for an equivalent custom-coded app. The Free plan provides enormous value for learning and prototyping at no cost. As you scale, costs do increase, and some users in the community have raised concerns about the affordability for very high-usage apps. However, when compared to the revenue or utility a successful app provides, Bubble’s pricing is often justified. Bubble is continuously improving performance and features, which adds to its value. Plus, you have the benefit of rapid development – which can save months (and thus thousands of dollars) in development costs. In summary, if you use Bubble for what it’s best at (quickly building and iterating on apps), the pricing is usually well worth it. Just be mindful to optimize your app (so it uses WUs efficiently) and choose the right plan/tier so you’re not overpaying for unused capacity. Many startups have scaled on Bubble and found that the ability to launch quickly and adjust costs as they grow is a strong value proposition.
Q7: Can I publish my Bubble app to app stores like the Apple App Store or Google Play Store?A: No, Bubble apps cannot be published directly to app stores such as the Apple App Store or Google Play Store. Bubble is designed for building web apps and progressive web apps (PWAs) that users access via a browser. If you need a native mobile app that can be distributed through app stores, you would need to use a different platform or a third-party wrapper service.
Q8: Does Bubble support features like push notifications or native app capabilities?A: Bubble supports web apps and progressive web apps (PWAs). PWAs can offer features like push notifications, which help you engage users with timely updates and messages. However, since Bubble apps are accessed through a browser and not as native apps, direct publishing to app stores is not supported.
(Bonus FAQs)Q9: Can I use Bubble for free indefinitely?A: Yes, you can stay on the Free plan as long as you want for development and testing purposes. There’s no time limit. Some users keep side-projects or prototypes on the free tier indefinitely. But remember, free apps can’t be fully launched to the public with a custom domain, so it’s not suitable for a production app beyond a small test user group or personal use.
Q10: Are there any hidden fees or additional costs beyond the plan and workload tiers?A: Bubble’s pricing is pretty transparent. The main costs are your subscription (plan) and any WU add-ons or overages. There are no bandwidth overage fees – Bubble’s current pricing includes generous bandwidth for each plan (as mentioned, e.g., 100 GB on Starter, 500 GB on Growth). However, a few potential additional costs to consider:
- Plugins: Many Bubble plugins are free, but some premium plugins in the Bubble marketplace cost money (either one-time or monthly). If your app relies on a paid plugin, that’s an extra cost (paid to the plugin developer).
- Domain Name: If you use a custom domain, you’ll need to purchase that domain from a registrar (Bubble doesn’t sell domains).
- Bulk Services: If you send a lot of emails through Bubble’s Sendgrid integration, or use external API services, those external services might have their own costs. Bubble doesn’t charge for API calls specifically (they just count towards WUs), but the API provider might charge you.
- Agency or Template fees: Not directly pricing plan related, but if you hire an agency or buy a template to build your Bubble app, that’s outside Bubble’s own pricing.
Otherwise, Bubble’s plans cover the platform usage fully. There’s no additional hosting fee or anything – it’s included in the subscription.
With the FAQs covered, let’s wrap up our guide on Bubble.io pricing.
Conclusion
Bubble.io’s pricing model offers a flexible and scalable way to build web applications without coding. We’ve explained Bubble.io pricing in depth, covering everything from the free tier to enterprise custom plans. The key is to choose the perfect plan that fits your current needs while keeping an eye on future growth. Start small if you’re unsure – Bubble’s Free and Starter plans let you get started with minimal cost. As your app grows, Bubble’s pricing scales with you: upgrade to Growth or Team when you need more power, and leverage workload add-ons or overages to fine-tune your resources. By understanding Workload Units (WUs) and plan features, you can optimize costs and ensure your app runs smoothly.
In 2025, Bubble.io continues to be an innovative no-code platform for entrepreneurs, students, and enterprises alike. It combines ease of use with a robust pricing system that rewards efficient apps and offers flexibility for heavy usage. With the insights from this guide, you’re now equipped with the knowledge and confidence to select the Bubble.io plan that is perfect for your project. Here’s to building and launching your app successfully, and may your chosen plan empower you to turn your ideas into reality!
Ready to take the next step? Whether you’re translating this information for a broader audience, looking to add visuals to your content, or feeling inspired to create something new, here are some suggested next actions:
- Translate this article – Convert the knowledge here into another language to share Bubble.io pricing insights with a non-English speaking audience.
- Generate Blog-Ready Images – Create or utilize infographics and screenshots (like plan comparisons or WU charts) to visually enhance your understanding of Bubble’s pricing in your own blog or documentation.
- Start a New Article – Begin writing your own article or documentation, perhaps a step-by-step guide on getting started with Bubble, now that you understand its pricing. Sharing your experience can help others in the no-code community.
Happy Bubbling, and good luck with your no-code journey!